Migrations in Entity Framework Core
Migration is a way to keep the database schema in sync with the EF Core model by preserving data.

As per the above figure, EF Core API builds the EF Core model from the entity classes, Data Annotations attributes applied on entity classes and Fluent API configurations in the DbContext class. EF Core migrations API will create or update the database schema based on the EF Core model. Whenever you change the domain classes, you need to run migration commands to keep the database schema up to date.
EF Core migrations are a set of commands which you can execute in Package Manager Console or PowerShell or in .NET Core CLI (Command Line Interface).
Adding a Migration
In the Working with DbContext chapter, we used the context.Database.EnsureCreated() method to create the database and schema for the first time.
Note that it creates a database first time only. It cannot change the DB schema after that. For the devlopement projects, we must use EF Core Migrations API.
To use EF Core Migrations API, we need to install the NuGet package Microsoft.EntityFrameworkCore.Tools. We use EF Core 7.0.11, so install the same version of package.
The following is our .NET 7 console project along with entities and a context (SchoolDbContext) class.
The following are Student and Grade classes.
public class Student
{
    public int StudentId { get; set; }
    public string FirstName { get; set; }
    public string LastName { get; set; }

    public int GradeId { get; set; }
    public Grade Grade { get; set; }
}

public class Grade
{
     public Grade()
     {
         Students = new List<Student>();
     }

    public int GradeId { get; set; }
    public string GradeName { get; set; }

    public IList<Student> Students { get; set; }
}
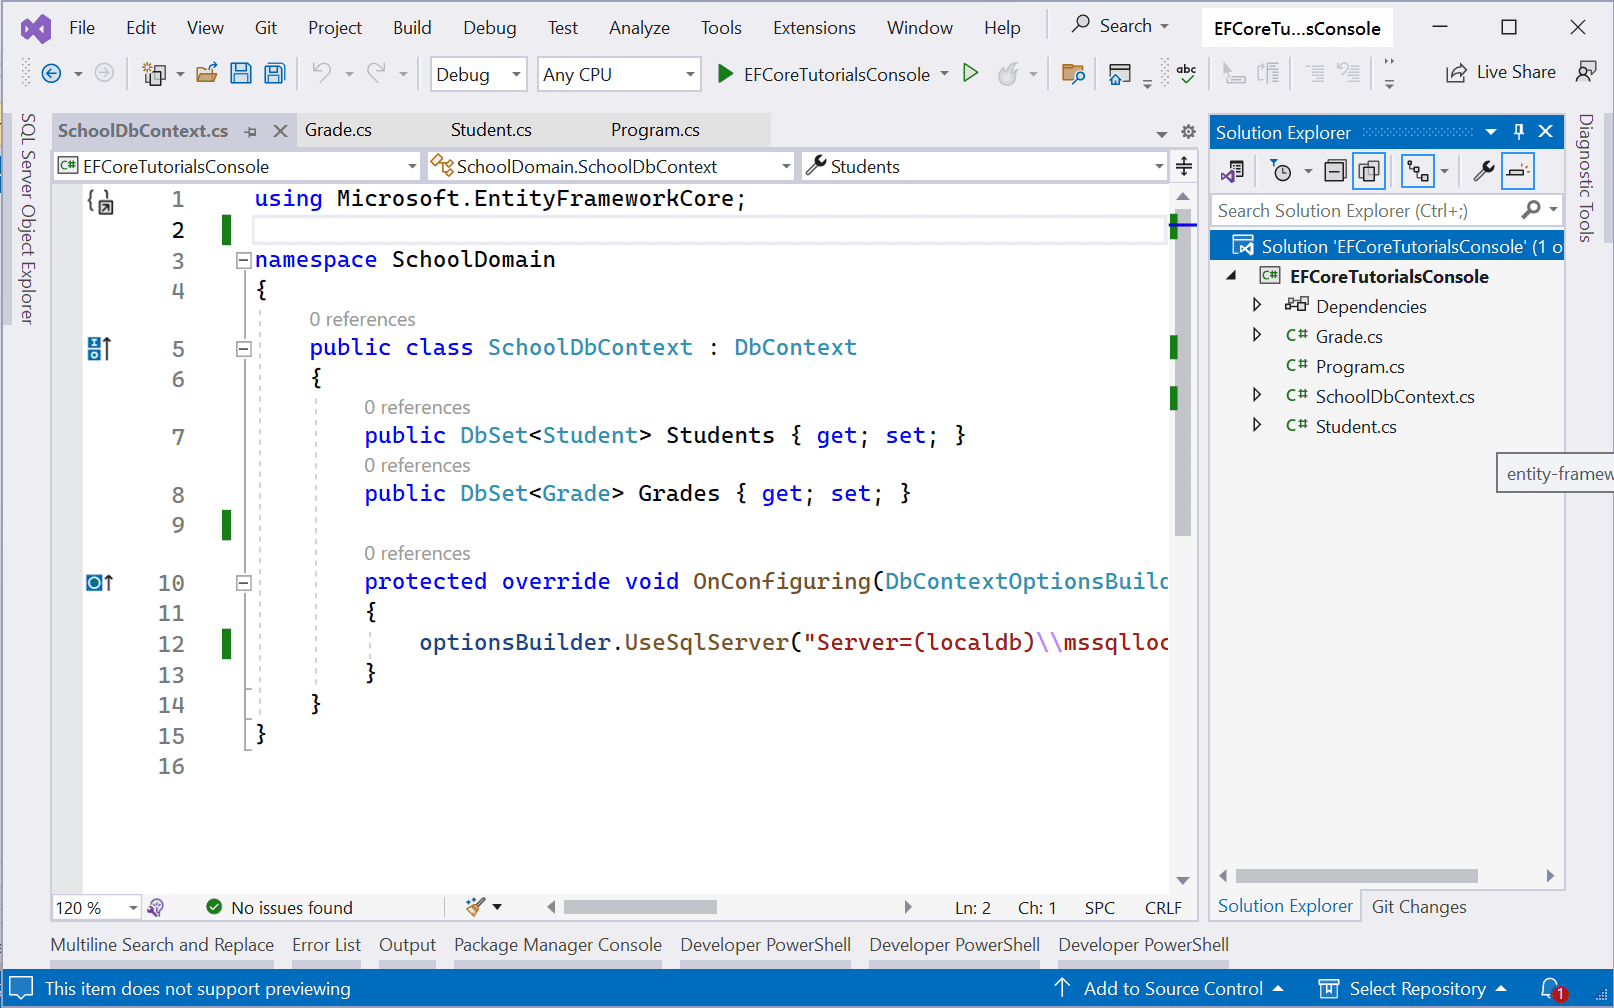
The following is our context class SchoolDbContext created in the Create DbContext chapter.
public class SchoolContext : DbContext
{
    //entities
    public DbSet<Student> Students { get; set; }
    public DbSet<Grade> Grades { get; set; }

    protected override void OnConfiguring(DbContextOptionsBuilder optionsBuilder)
    {
        optionsBuilder.UseSqlServer("Server=(localdb)\\mssqllocaldb;Database=SchoolDB;Trusted_Connection=True;");
    }
}
EF Core provides migrations commands to create, update, or remove tables and other DB objects based on the entities and configurations.
At this point, there is no SchoolDB database. So, we need to create the database from the model (entities and configurations) by adding a migration.
You can execute migration commands using Package Manager Console, PowerShell or .NET Core CLI tools as per your choice. Microsoft recommends .NET Core CLI tools because it runs on all platforms. Since we are using Visual Studio so we will use Package Manager Console commands (PMC and PowerShell commands are same).
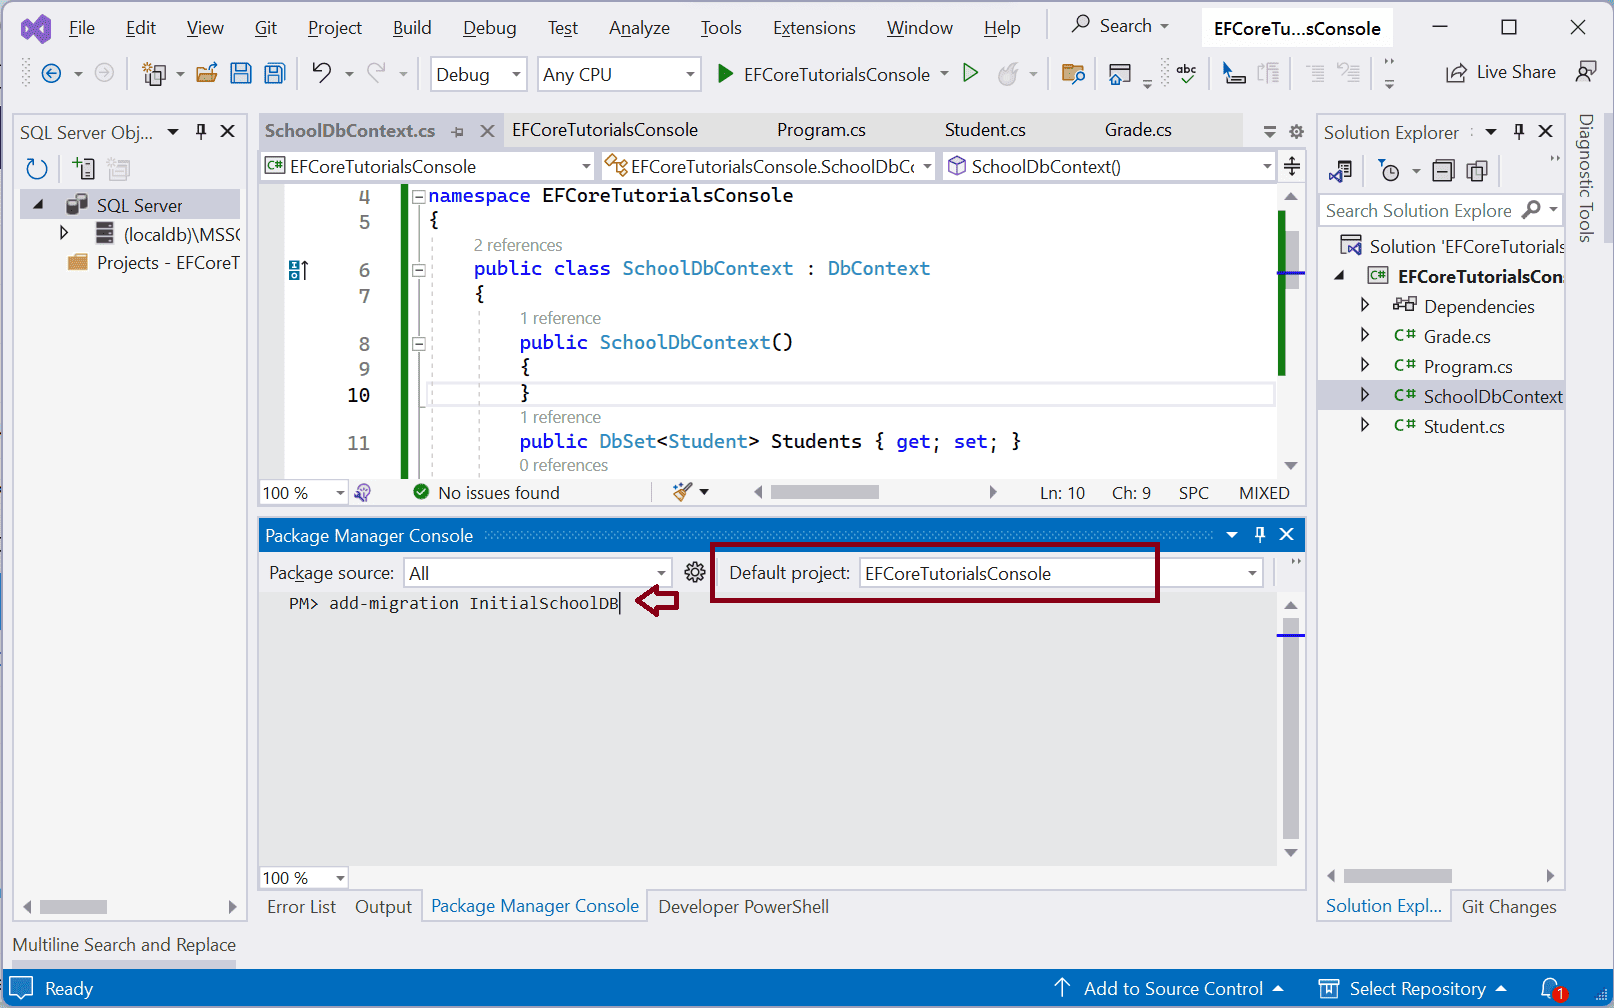
In Visual Studio, open NuGet Package Manager Console from Tools -> NuGet Package Manager -> Package Manager Console and enter the following command:
Package Manager Console/PowerShell
add-migration InitialSchoolDB
Make sure that Default Project points to where your context and entities are, and then execute the command, as shown below.
If you use .NET Core CLI, then enter the following command.
.NET Core CLI
dotnet ef migrations add InitialSchoolDB
This will create a new folder named Migrations in the project and create the ModelSnapshot files, as shown below.
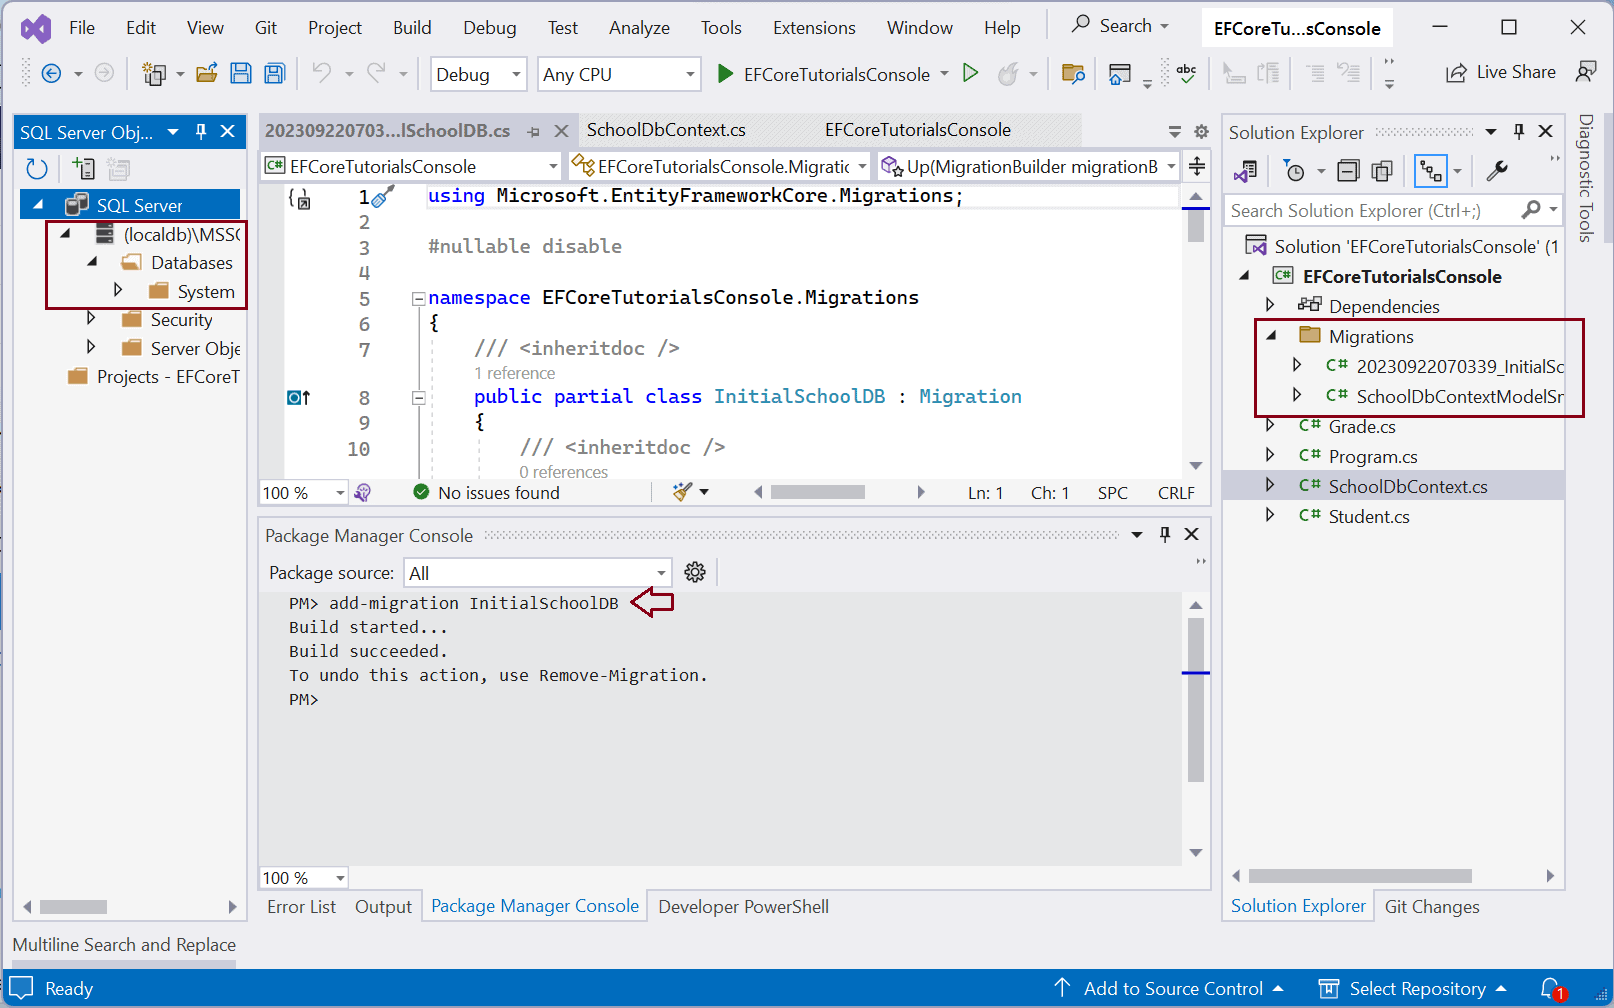
The Add-Migration command does not create the database. It just creates the two snapshot files in the Migrations folder.
-
<timestamp>_<Migration Name>.cs: The main migration file which includes migration operations in the
Up()andDown()methods. TheUp()method includes the code for creating DB objects and theDown()method includes code for removing DB objects. - <contextclassname>ModelSnapshot.cs: A snapshot of your current model. This is used to determine what changed when creating the next migration.
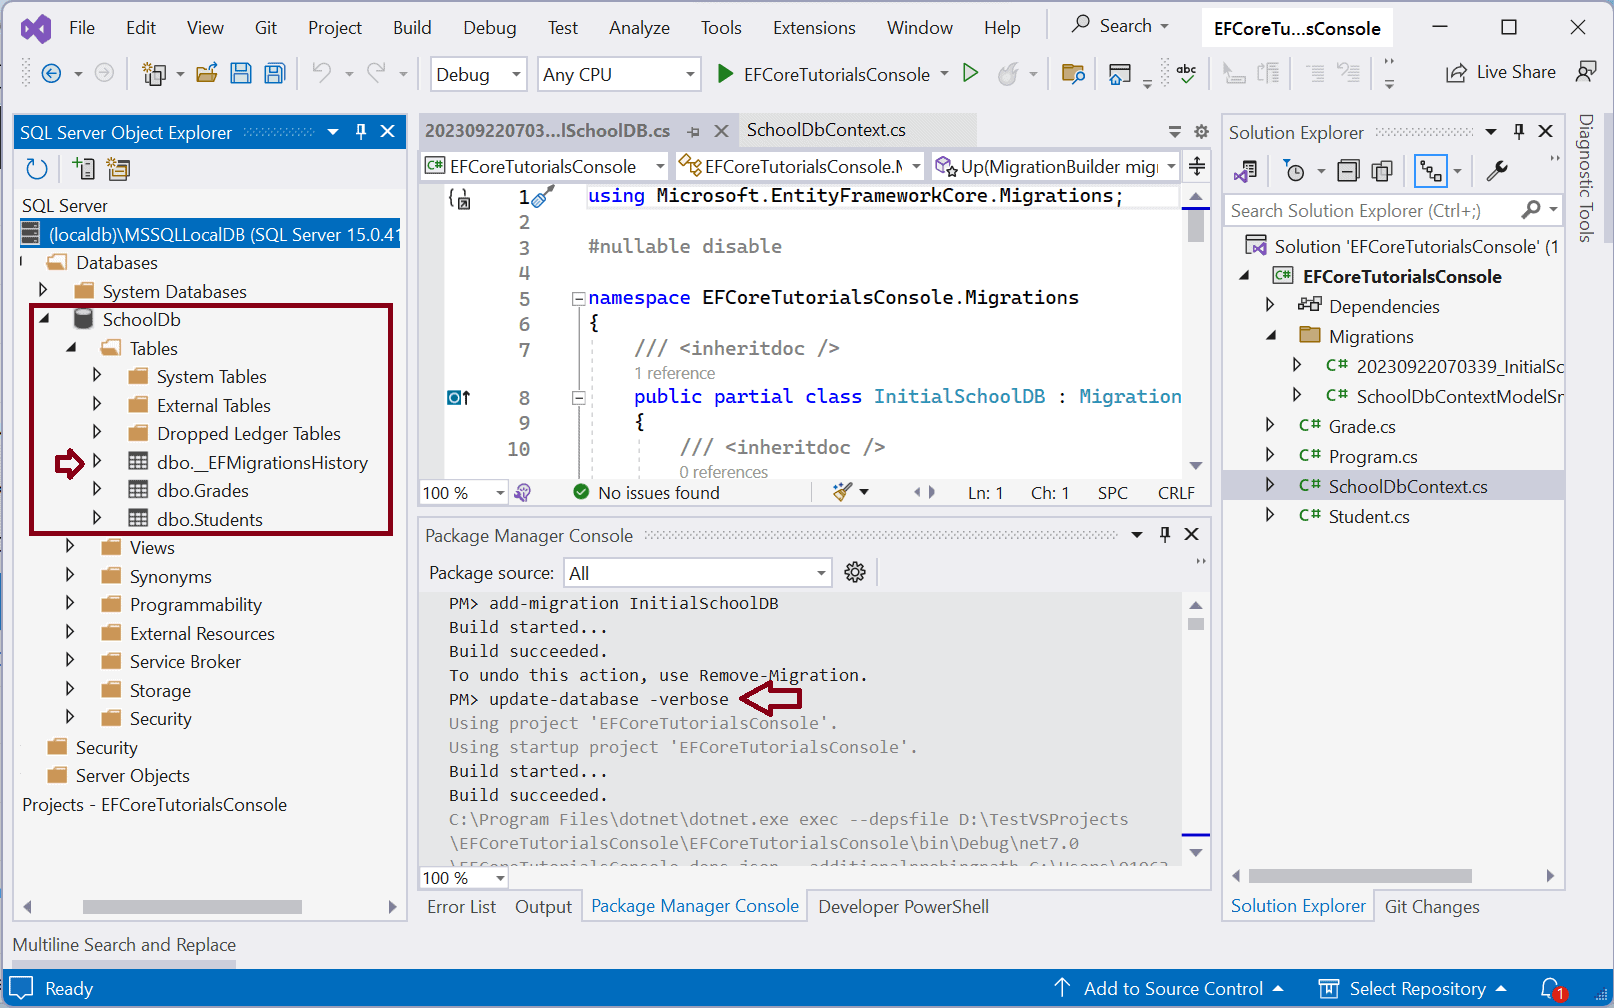
Now, to create a database, use the update-database command in the Package Manager Console, as shown below.
Package Manager Console/PowerShell
update-database –verbose
The following executes the update-database command and creates the database, as shown below. The -verbose option shows the logs while creating the database.
It creates a database with the name and location specified in the connection string in the UseSqlServer() method.
It creates a table for each entity, Student and Grade). It also creates _EFMigrationHistory table that stores history of migrations applied overtime.
Use the following command in .NET Core CLI to create a database.
.NET Core CLI
dotnet ef database update
Apply Migrations for Modified Entities/Configurations
Suppose we add some new entities or modify an existing entities or changed any configuration, then we again need to execute the add-migration and update-migration commands to apply changes to the database schema.
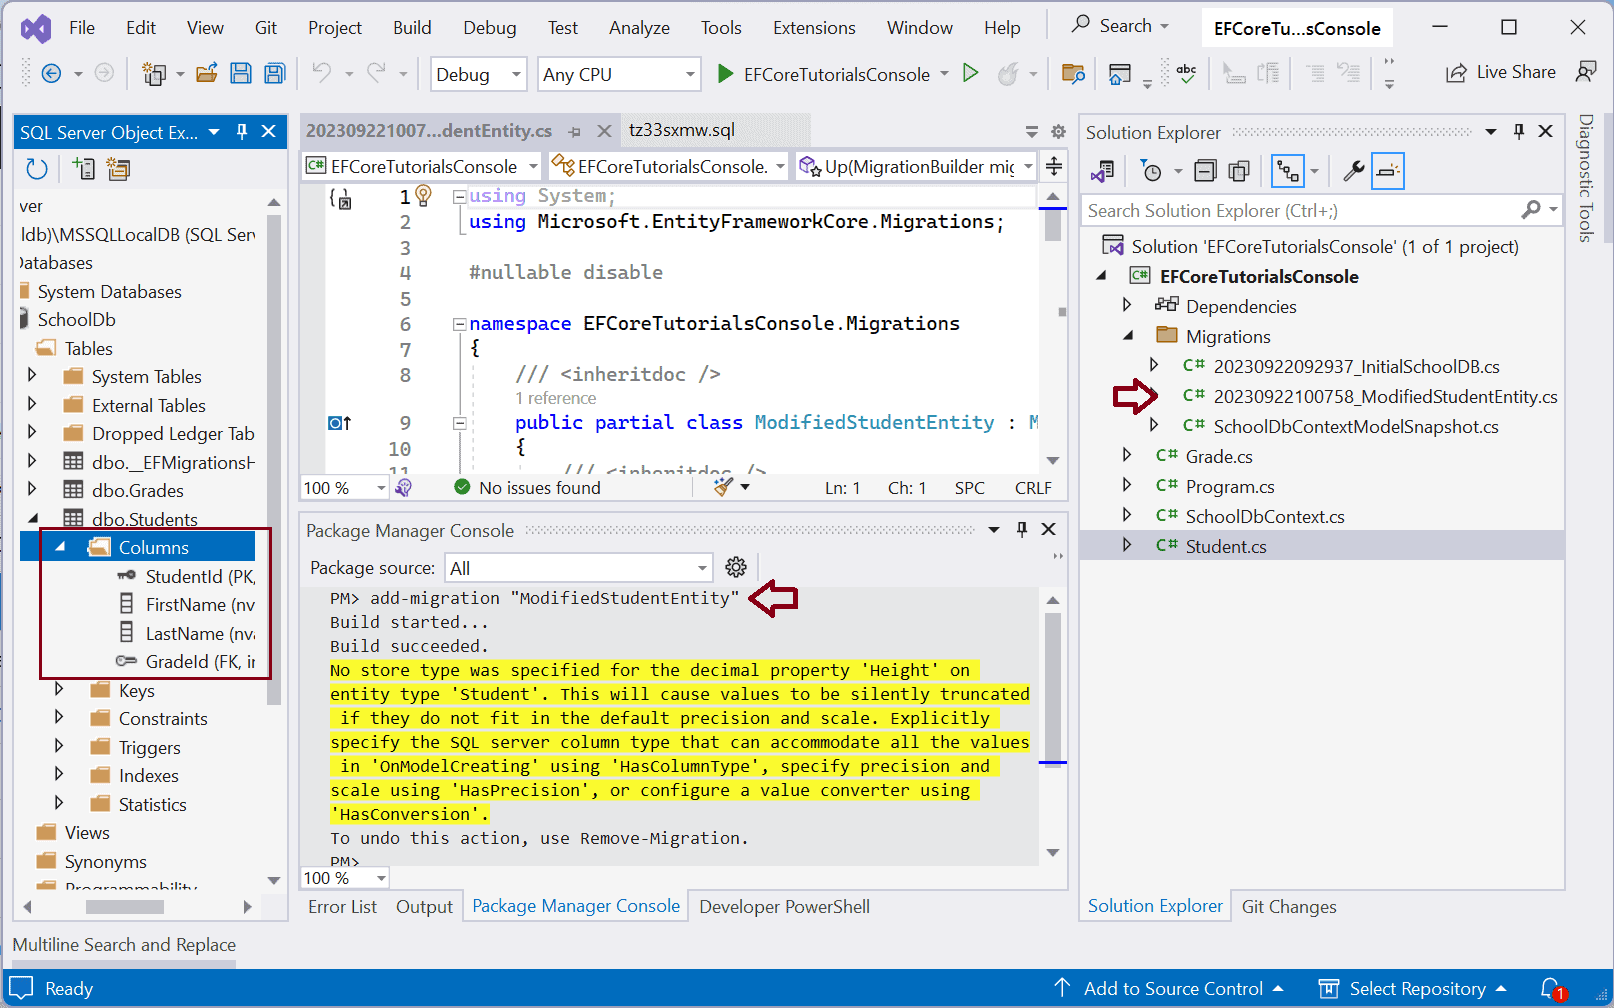
For example, let's modify the Student entity and add some properties, as shown below.
public class Student
{
    public int StudentId { get; set; }
    public string FirstName { get; set; }
    public string LastName { get; set; }
    public DateTime DateOfBirth { get; set; }
    public byte[] Photo { get; set; }
    public decimal Height { get; set; }
    public float Weight { get; set; }

    public int GradeId { get; set; }
    public Grade Grade { get; set; }
}
Now, to sync our "SchoolDB" database with this changes, execute the following commands:
Package Manager Console/PowerShell
add-migration "ModifiedStudentEntity"
This will generate another snapshot in the Migrations folder.
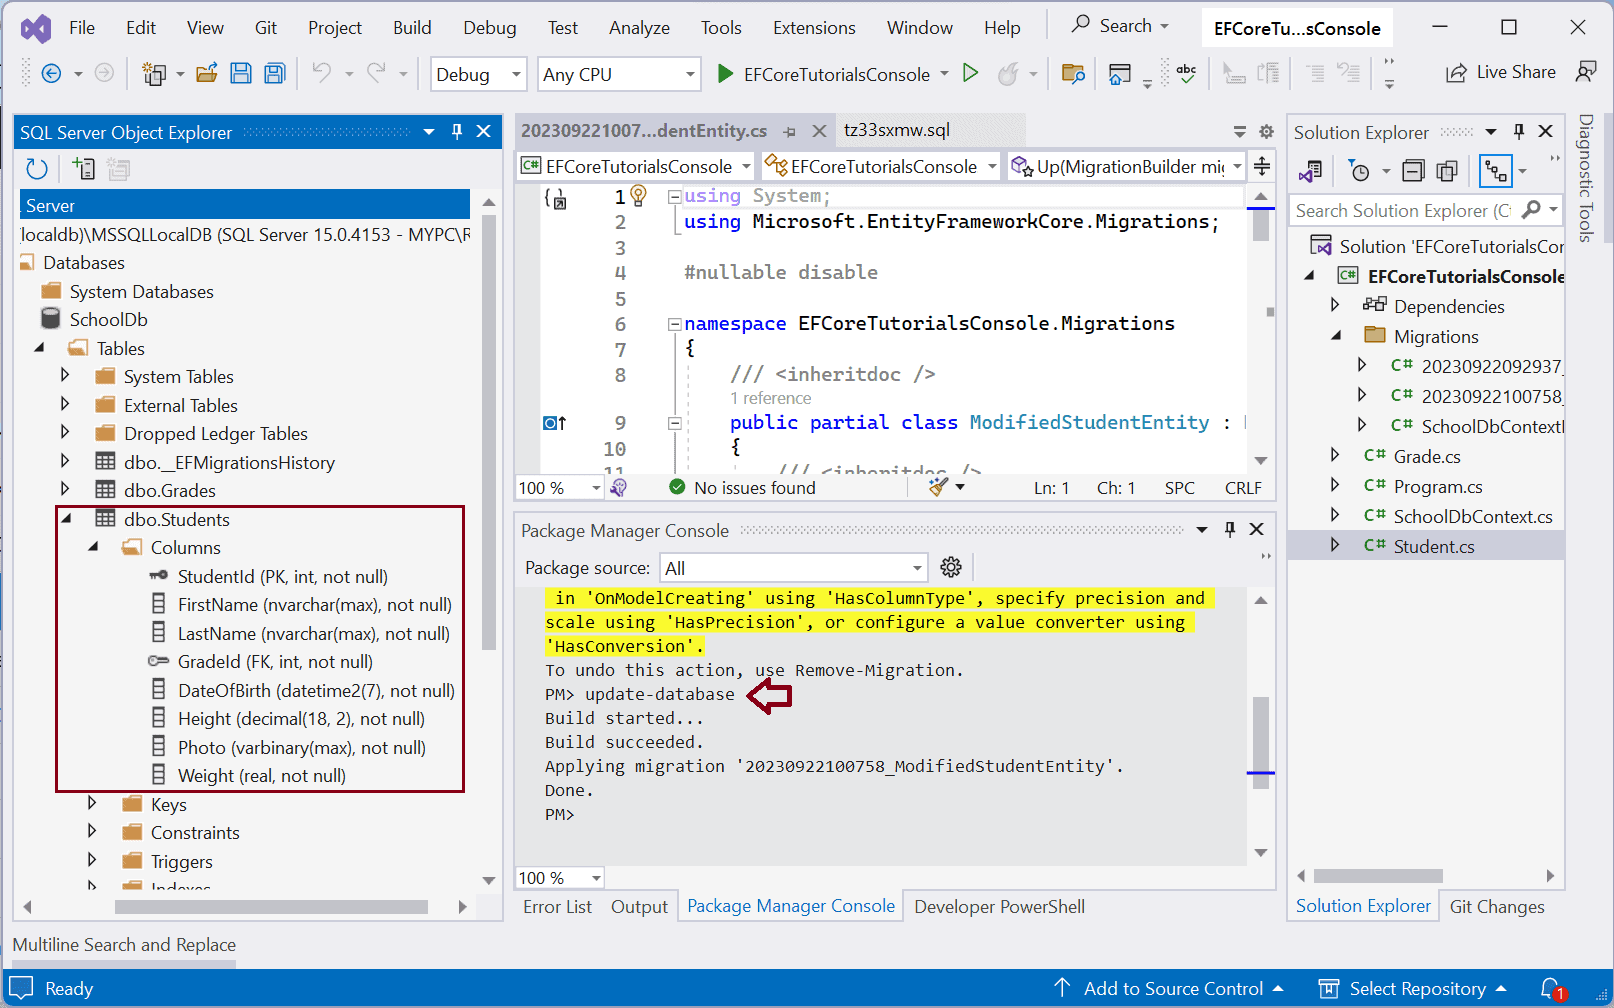
Now, to update the database schema, execute the update-database command in PMC/PowerShell.
This will add the columns in the Student table, as shown below.
In this way, you can keep adding, modifying or removing entities from EF Core model and sync the database using migrations.
Reverting Migration
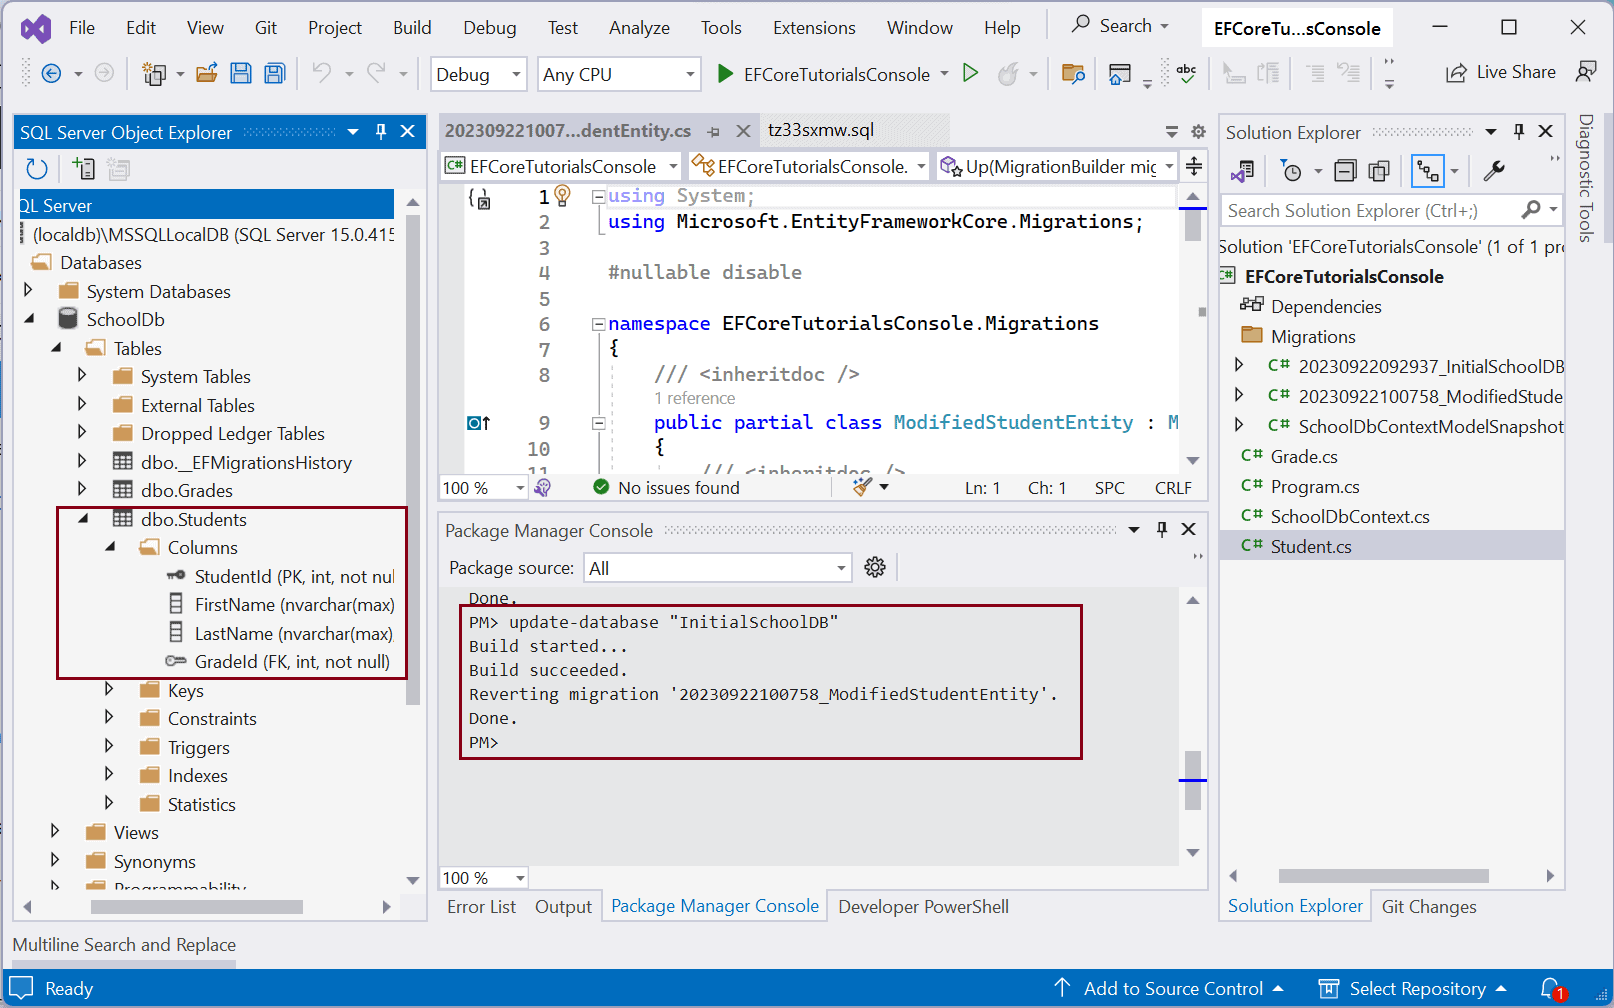
For some reason, if you want to revert the database to any of the previous state then you can do it by using the update-database <migration-name> command.
For example, we modified the Student entity and added some more properties. But now we want to revert it back to same as "InitialSchoolDB" migration.
We can do it by using the following command:
Package Manager Console/PowerShell
Update-database "InitialSchoolDB"
.NET Core CLI
dotnet ef database update "InitialSchoolDB".
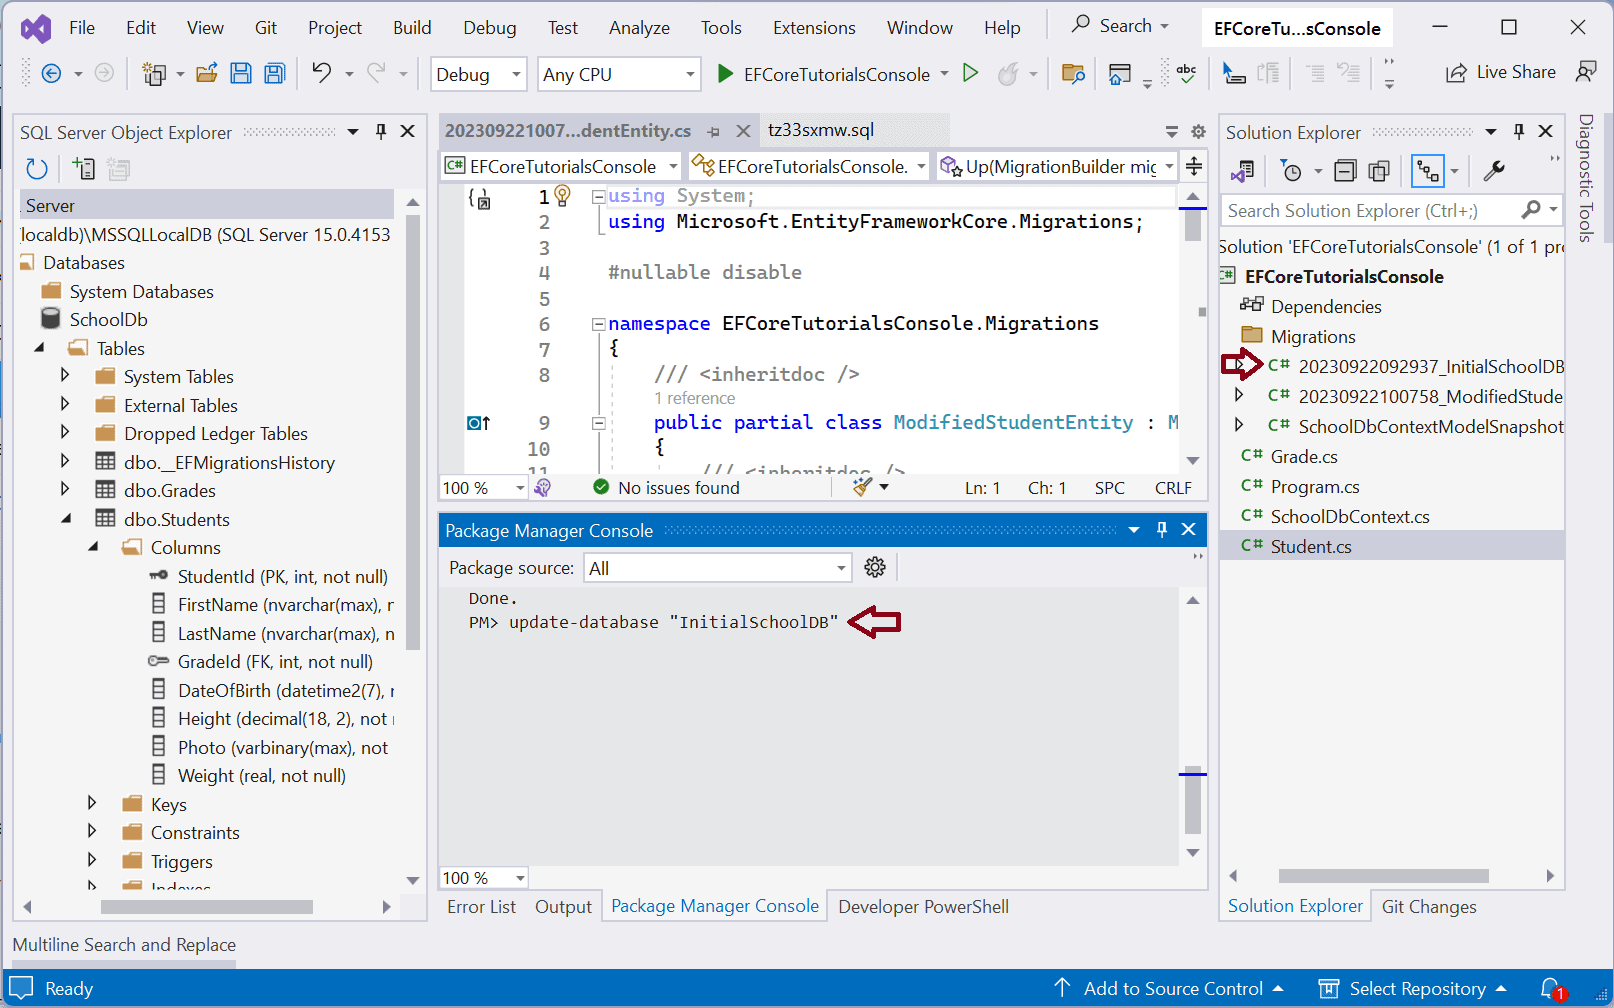
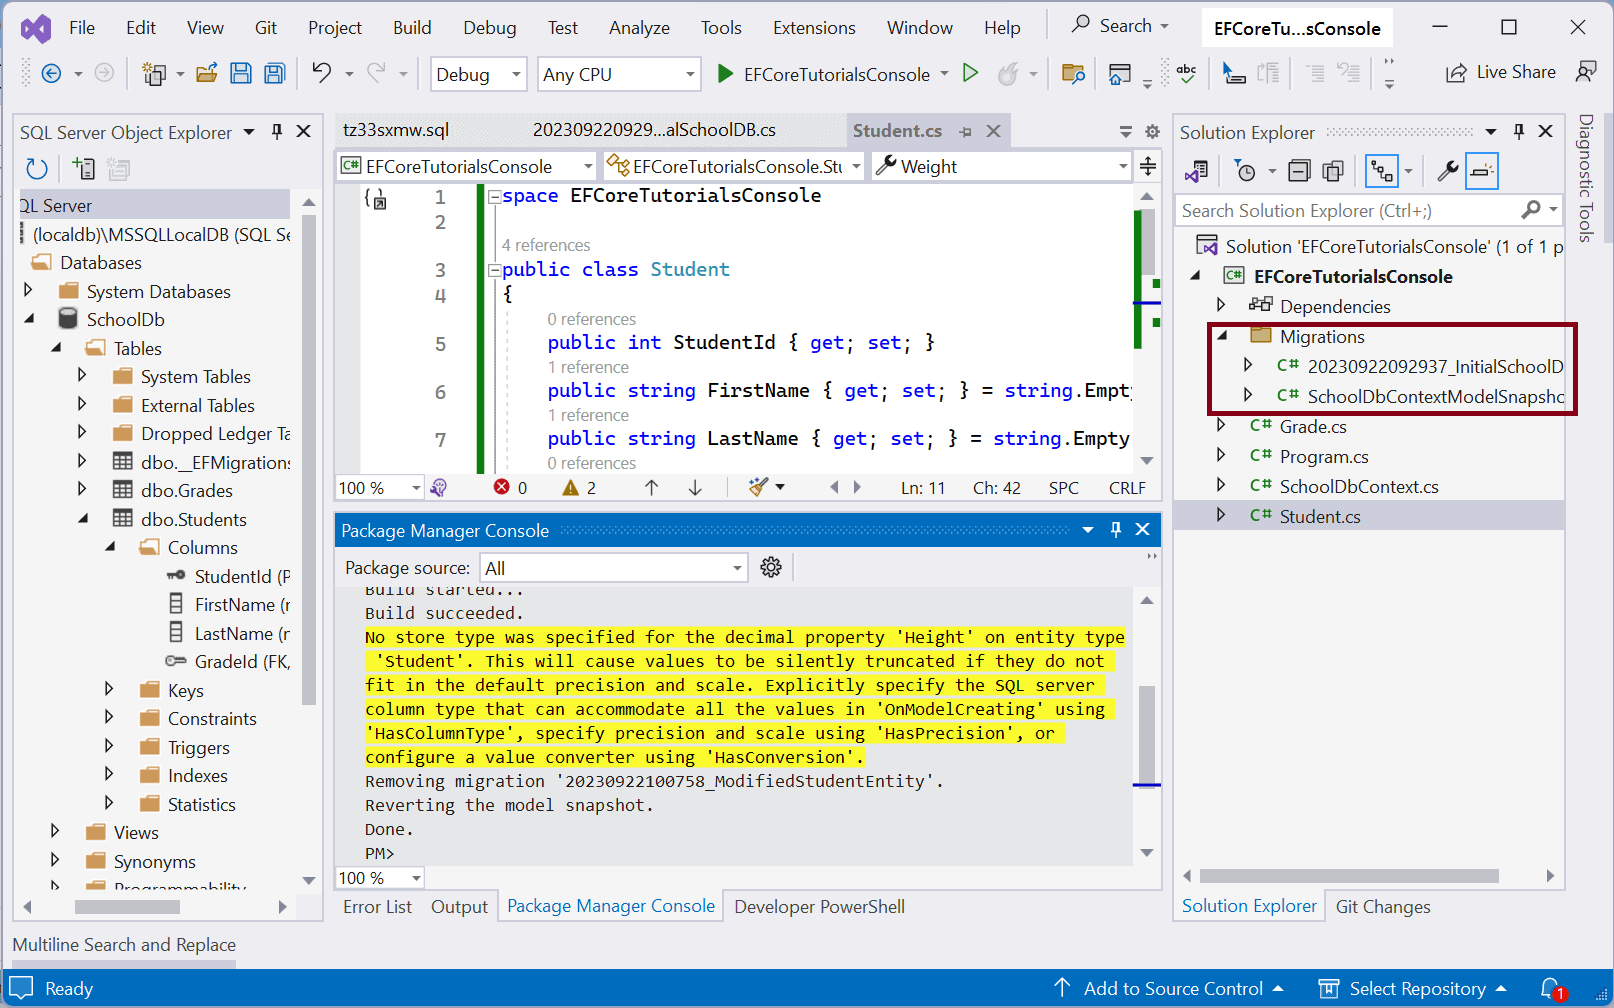
The above command will revert the database based on a migration named InitialSchoolDB and remove all the changes applied for the second migration ModifiedStudentEntity.
This will also remove ModifiedStudentEntity entry from the __EFMigrationsHistory table in the database.
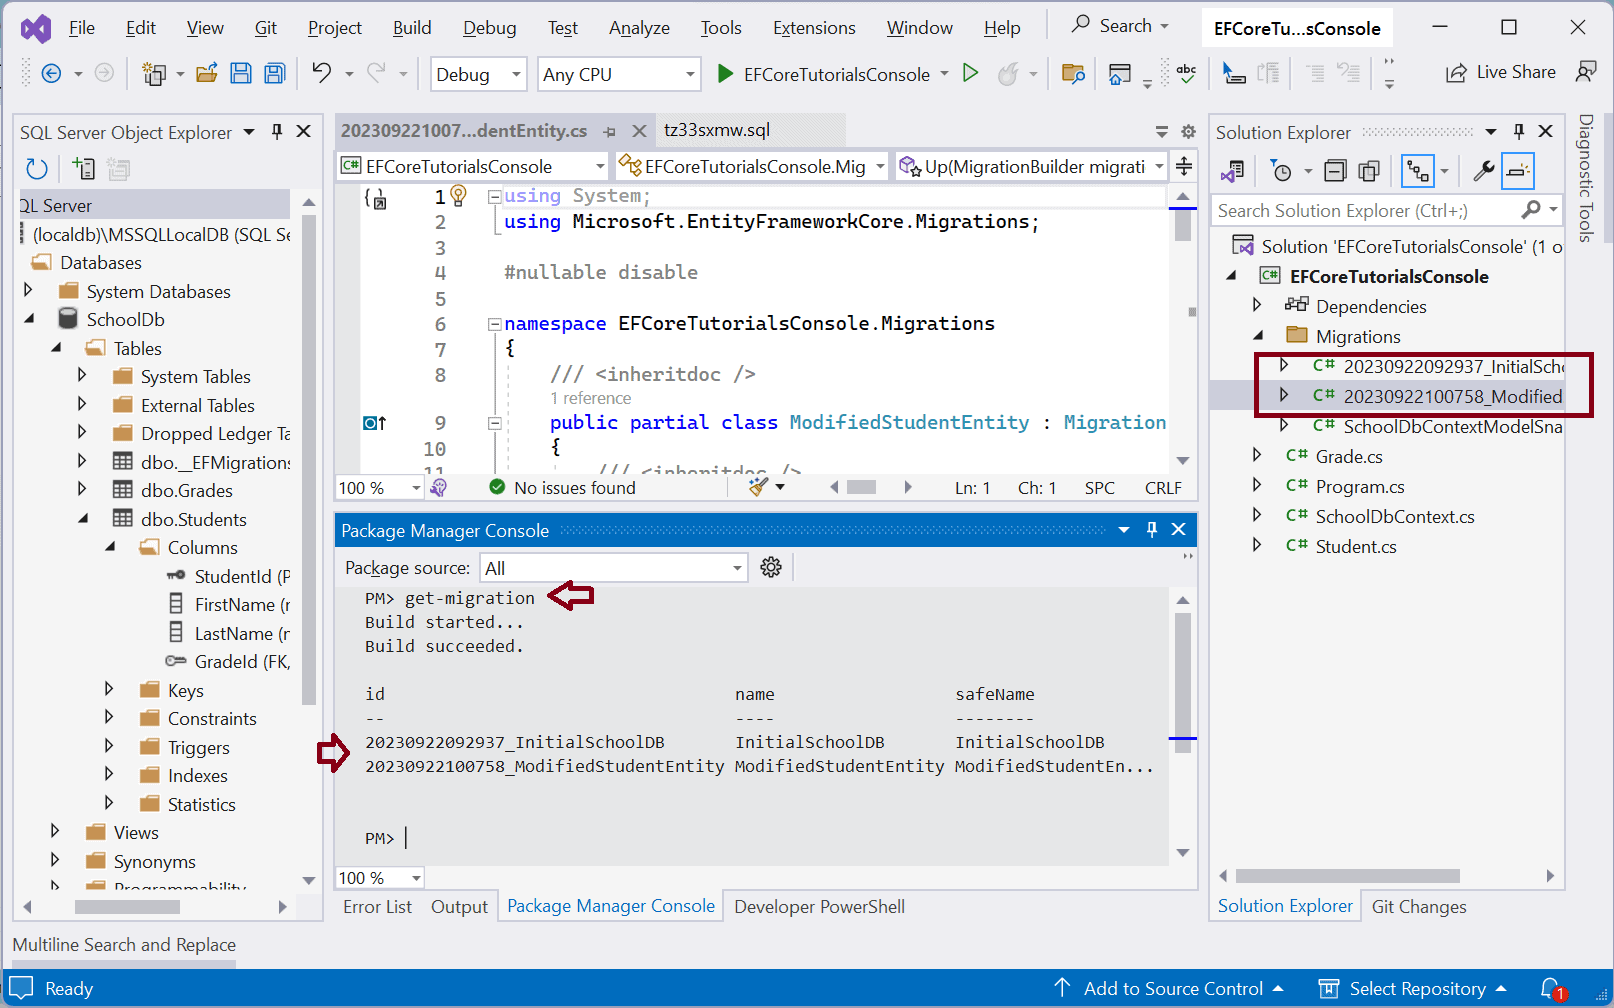
List All Migrations
Use the following migration command to get the list of all migrations.
Get-Migration.NET Core CLI
dotnet ef migrations list
The following lists all migrations:
Removing a Migration
Above, we have reverted the second migration named "ModifiedStudentEntity". We can remove the last migration if it is not applied to the database. Let's remove the Use the "ModifiedStudentEntity" file using the following remove commands.
Package Manager Console/PowerShell
remove-migration
.NET Core CLI
dotnet ef migrations remove
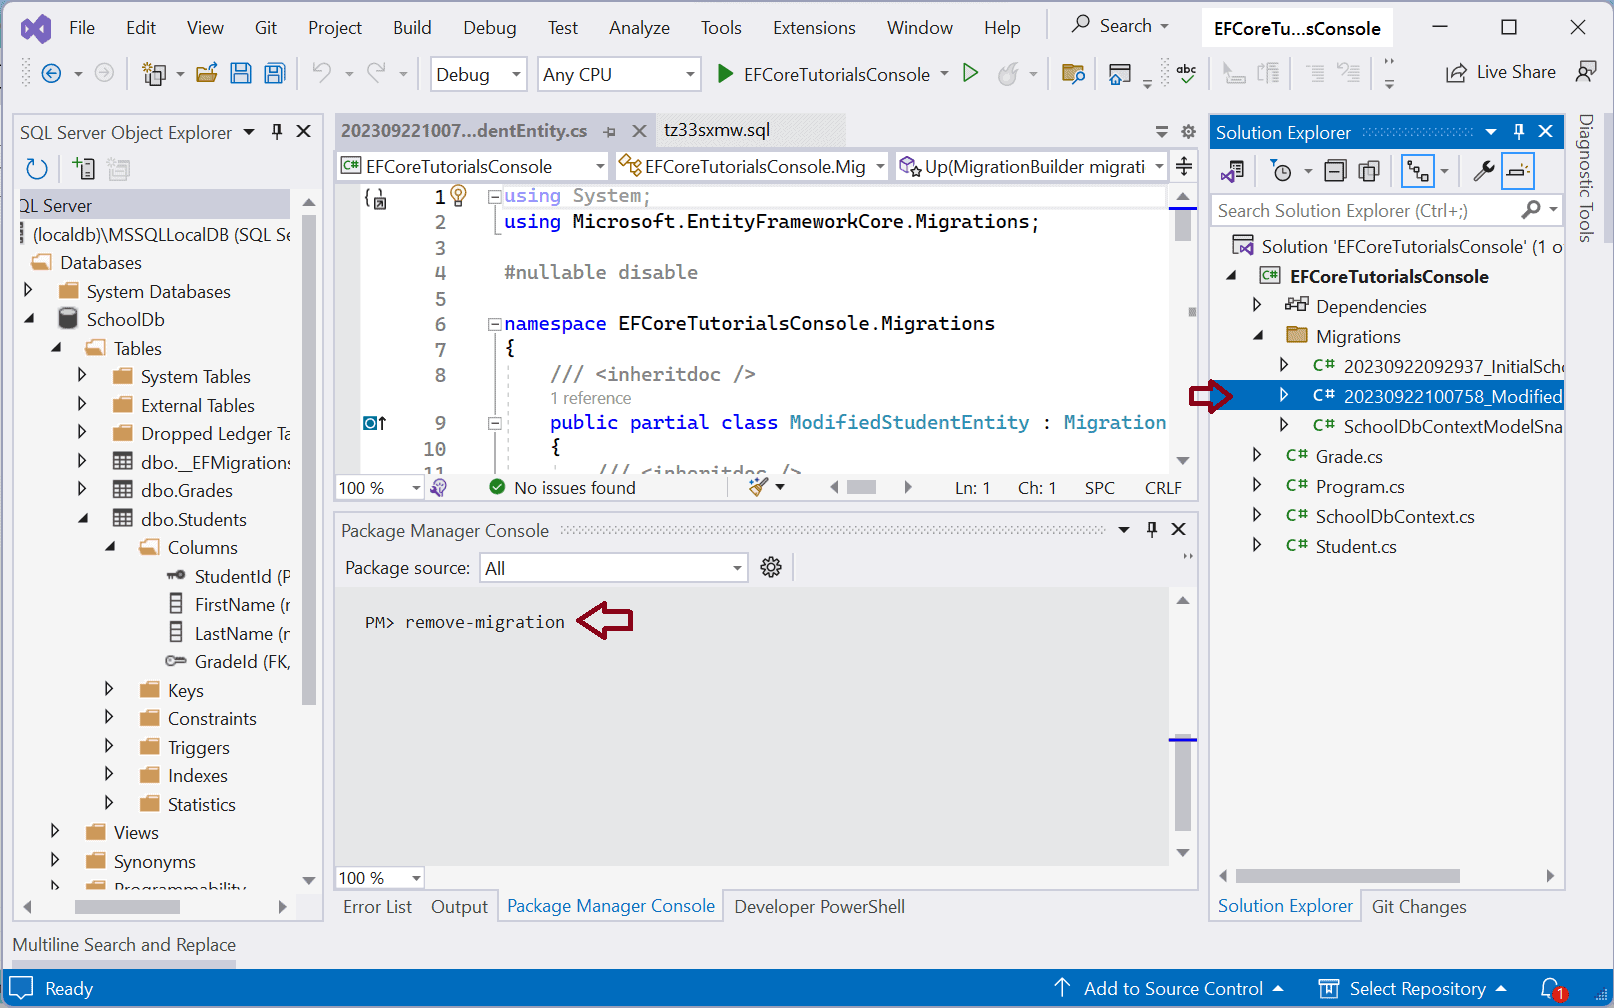
The above commands will remove the last migration and revert the model snapshot to the previous migration, as shown below. Please note that if a migration is already applied to the database, then it will throw the exception.