Transaction in Entity Framework
Here you will learn about the transactions in EF 6.x & EF Core.
In Entity Framework, the SaveChanges() method internally creates a transaction and wraps all INSERT, UPDATE and DELETE operations under it. Multiple SaveChanges() calls create separate transactions, perform CRUD operations and then commit each transaction. The following example demonstrates this.
using (var context = new SchoolContext())
{
    context.Database.Log = Console.Write;

    var standard = context.Standards.Add(new Standard() { StandardName = "1st Grade" });

    context.Students.Add(new Student()
    {
        FirstName = "Rama",
        StandardId = standard.StandardId
    });

    context.SaveChanges();

    context.Courses.Add(new Course() { CourseName = "Computer Science" });
    context.SaveChanges();
}
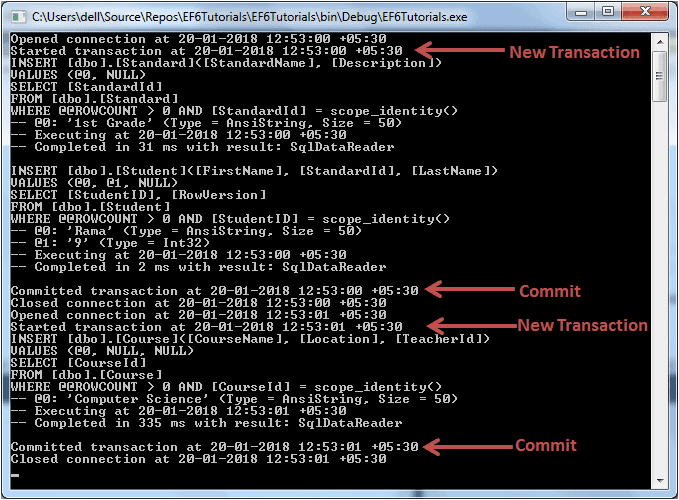
The above example will display the following output to the console.

In the above example, we log all the database commands to the console. We add a new Standard entity and Student entity and save them to the database using the SaveChanges() method.
This will create a new transaction and execute INSERT commands for Standard and Student entities within a transaction and commit them.
After this, we add a new Course entity and call SaveChanges(). This will create another transaction, execute the INSERT command and then commit the transaction.
Thus, each SaveChanges() method call creates a new transaction and executes database commands within it.
Multiple SaveChanges in a Single Transaction
EF 6 and EF Core allow us to create or use a single transaction with multiple SaveChanges() calls using the following methods:
- DbContext.Database.BeginTransaction(): Creates a new transaction for the underlying database and allows us to commit or roll back changes made to the database using multiple SaveChanges method calls.
- DbContext.Database.UseTransaction(): Allows us to pass an existing transaction object created out of the scope of a context object. This will allow EF to execute commands within an external transaction object. Alternatively, pass in null to clear the framework's knowledge of that transaction.
DbContext.Database.BeginTransaction()
The following example demonstrates creating a new transaction object using BeginTransaction(), which is then used with multiple SaveChanges() calls.
using (var context = new SchoolContext())
{
    context.Database.Log = Console.Write;

    using (DbContextTransaction transaction = context.Database.BeginTransaction())
    {
        try
        {
            var standard = context.Standards.Add(new Standard() { StandardName = "1st Grade" });

            context.Students.Add(new Student()
            {
                FirstName = "Rama2",
                StandardId = standard.StandardId
            });
            context.SaveChanges();

            context.Courses.Add(new Course() { CourseName = "Computer Science" });
            context.SaveChanges();

            transaction.Commit();
        }
        catch (Exception ex)
        {
            transaction.Rollback();
            Console.WriteLine("Error occurred.");
        }
    }
}
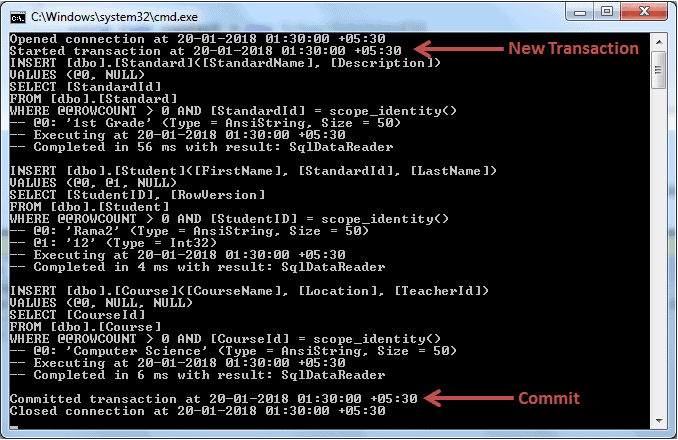
In the above example, we create new Standard,Student and Course entities and save them to the database by calling two SaveChanges(), which execute INSERT commands within one transaction. The following image shows the output log.

Note: You can specify different isolation levels in the DbContext.Database.BeginTransaction() method. Visit MSDN to learn more about isolation levels.
If an exception occurs, then the whole changes made to the database will be rolled back.
using (var context = new SchoolContext())
{
    context.Database.Log = Console.Write;

    using (DbContextTransaction transaction = context.Database.BeginTransaction())
    {
        try
        {
            var standard = context.Standards.Add(new Standard() { StandardName = "1st Grade" });

            context.Students.Add(new Student()
            {
                FirstName = "Rama",
                StandardId = standard.StandardId
            });
            context.SaveChanges();
            // throw exception to test rollback transaction
            throw new Exception();

            context.Courses.Add(new Course() { CourseName = "Computer Science" });
            context.SaveChanges();

            transaction.Commit();
        }
        catch (Exception ex)
        {
            transaction.Rollback();
            Console.WriteLine("Error occurred.");
        }
    }
}
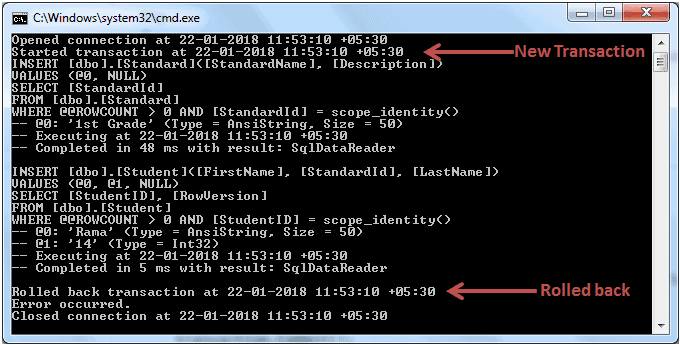
In the above example, we throw an exception after the first SaveChanges() call. This will execute a catch block where we call the Rollback() method to roll back whatever changes have been made to the database. The following figure shows the output.

DbContext.Database.UseTransaction()
The DbContext.Database.UseTransaction() method allows us to use an existing transaction created out of the scope of the context object.
If we use the UseTransaction() method, then the context will not create an internal transaction object and will use the supplied transaction.
The following example demonstrates the UseTransaction() method with EF 6 code-first approach.
private static void Main(string[] args)
{
    string providerName = "System.Data.SqlClient";
    string serverName = ".";
    string databaseName = "SchoolDB";

    // Initialize the connection string builder for the SQL Server provider.
    SqlConnectionStringBuilder sqlBuilder =
        new SqlConnectionStringBuilder();

    // Set the properties for the data source.
    sqlBuilder.DataSource = serverName;
    sqlBuilder.InitialCatalog = databaseName;
    sqlBuilder.IntegratedSecurity = true;

    using (SqlConnection con = new SqlConnection(sqlBuilder.ToString()))
    {
        con.Open();
        using (SqlTransaction transaction = con.BeginTransaction())
        {
            try
            {
                using (SchoolContext context = new SchoolContext(con, false))
                {
                    context.Database.UseTransaction(transaction);

                    context.Students.Add(new Student() { Name = "Ravi" });
                    context.SaveChanges();
                }

                using (SchoolContext context = new SchoolContext(con, false))
                {
                    context.Database.UseTransaction(transaction);

                    context.Grades.Add(new Standard() { GradeName = "Grade 1", Section = "A" });
                    context.SaveChanges();
                }
                transaction.Commit();
            }
            catch (Exception ex)
            {
                transaction.Rollback();

                Console.WriteLine(ex.InnerException);
            }
        }
    }
}
The following is a SchoolContext class used in the above example.
public class SchoolContext : DbContext
{
    public SchoolContext(DbConnection con, bool contextOwnsConnection) :base(con, contextOwnsConnection)
    {

    }
    public SchoolContext(): base("SchoolDB")
    {
        Database.SetInitializer<SchoolContext>(new CreateDatabaseIfNotExists<SchoolContext>());
    }

    public DbSet<Student> Students { get; set; }
    public DbSet<Standard> Grades { get; set; }
    public DbSet<Course> Courses { get; set; }
}